Chubricks 101 Guide
written by xsfunc
Guide list:
- Chubricks 101 Guide. (You are here)
- Chubricks Deep Dive Guide. Endless potential of SVG effects
⚠️ To get WL access, send your address and what you got in a tweet comment here https://twitter.com/xsfunc/status/1688582283723149313
This tutorial will guide you through the process of creating unique art pieces by interacting with different nodes. By the end of this tutorial, you'll be able to drag and drop, configure and connect nodes to mint your very own piece of art.
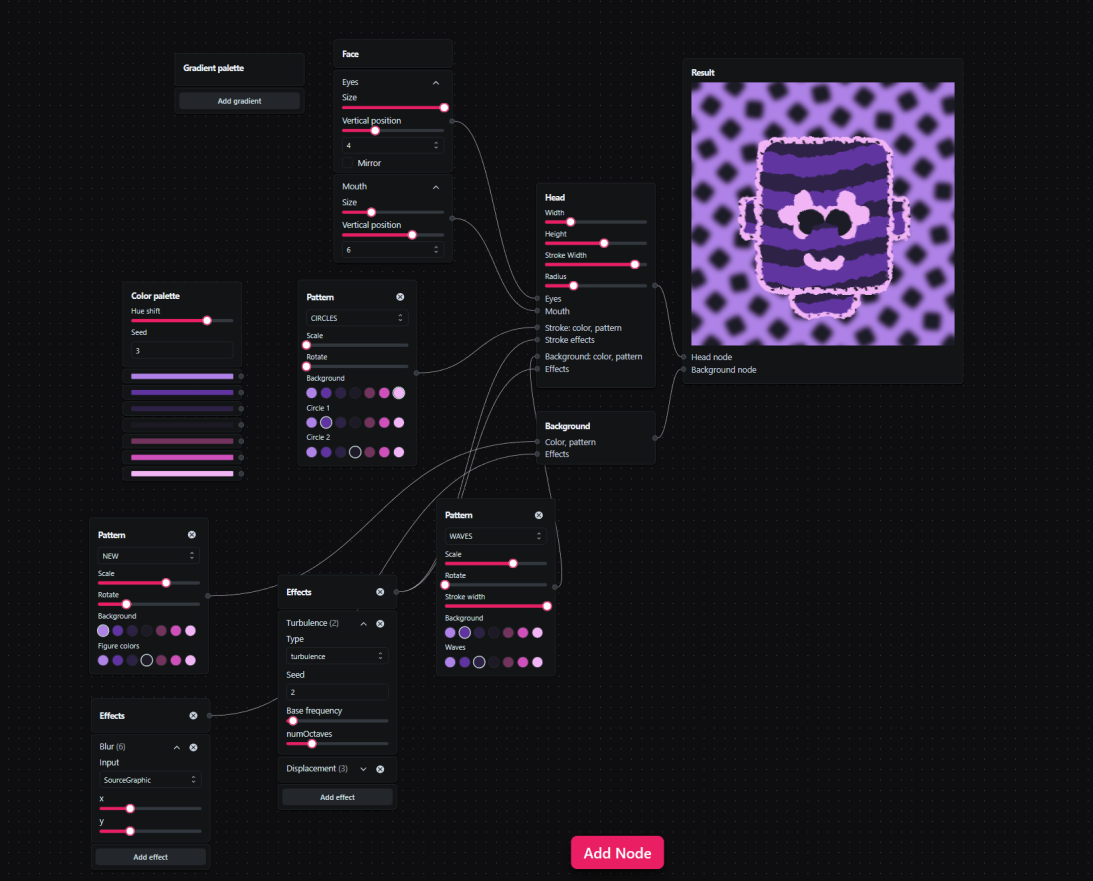
Click to params button under preview to open node editor.
project name project name project name
project name project name project name
Understanding the Nodes:
Before diving into the creation process, let's understand each node:
- Palette Node allows you to select and customize color palettes
- Gradients Palette Node lets you create and adjust gradients
- Pattern Node. Here, you can choose and modify various patterns
- Effects Node. Add finishing touches, filters, and effects to your piece
- Head and Face Node. The primary node that determines main structure of your art
- Background Node. Adjust and set the backdrop of your artwork
🚩Very important thing first!
Do not switch to standalone mode until you are ready to mint the result, otherwise when you return to mint mode everything will reset. Also you can hide left panel for more space.
Understanding node manipulation
Manipulating nodes in a graphical interface is an intuitive process that enables users to visualize and control data flow or relationships. To start, users can easily click on a node and drag it to the desired position within the workspace.
The drag-and-drop functionality offers a tactile experience, making it easy and visually satisfying to arrange nodes. Beyond mere positioning, nodes can be interconnected using edges. To create an edge, simply click on the output point of one node (a small circle) and drag it to the input point of another node. This action establishes a link or relationship between the two nodes, enabling the flow of data or information from one to the other.
If you wish to delete edge, simply select it and press the Del or Backspace button. To modify a connection, drag from the new desired output point to the target input point.
Create art step by step 👣
Step 1. Setting the palette
Begin with the Color Palette Node. Adjust the Seed parameter to generate a random color palette. This will give you 7 unique colors to work with. Use the Hue shift parameter to change the hue of the generated colors if desired.
The Gradient Palette Node is a useful tool that allows you to generate 5 different gradients. You have the option to select either linear or radial gradient types based on your preferences. Additionally, you can easily adjust the color stops to define how the colors smoothly transition within each gradient. These gradients can be applied in multiple areas of your artwork, giving you more creative flexibility.
Step 2. Crafting the Pattern
Add Pattern Node. Select a base pattern from the available options. Adjust the rotation and scale to achieve your desired look. Customize your pattern by choosing colors from the color palette.
To enhance the visual appeal of your designs, you have the flexibility to add multiple pattern nodes. This allows you to create various patterns and apply them selectively as backgrounds or head filling. Alternatively, you can choose not to use any pattern at all for a clean and minimalist look.
Step 3. Designing the Face
To create a face using Face Node, begin by focusing on the eyes. Choose the eye variant that you prefer, adjust its size as needed, and position it vertically on the face. Afterward, select a mouth variant and customize its size to fit your desired look. Position it vertically as well. Keep in mind that the face is a crucial element in your artwork, so take your time to ensure it meets your expectations and captures the desired expression accurately.
Step 4. Applying Effects
The Effects Node is a valuable tool that offers a multitude of possibilities for enhancing your compositions. One notable feature is the ability to incorporate SVG filter effects into your work. While we will explore this topic more extensively in a future tutorial, it's important to recognize the potential value that the Effects Node brings to your creative endeavors.
Step 5. Crafting the Head
To customize the appearance of the face, you have the option to connect a color, pattern, or gradient node to fill it. Similarly, you can choose a color, pattern, or gradient for the stroke. Additionally, you can connect individual effects to further enhance the stroke and fill of the face. Parameters such as width, height, and stroke width can be adjusted according to your preferences. If desired, you also have the flexibility to hide the neck.
Step 6. Setting the Background
Background Node allows you to customize the background behind the head by selecting a color, pattern, or gradient. Additionally, you can enhance the visual appeal by applying various effects that add depth to the overall design.
Step 7. Save as image and check storage limit
You can save the image to by clicking on the download button on the top right Result Node. Another thing to know is that your composition configuration is stored on the blockchain. And blockchain data is expensive, so I've limited you to 2 bytes. You can see the progress bar below your result, which shows how much space you have taken up. It looks small, but should be enough for most ideas. The effects take up the most data.
When you delete a Pattern node or Effects node, the pattern and effects data is still there, so you need to delete them additionally by clicking the button to the right of the progress bar. This is an optional action. Only clear the memory if you are short of it.
Congratulations! You've now learned the basics of interacting with nodes to create generative art. As you become more familiar with the system, you'll discover the vast potential it holds. Remember, the journey of creating generative art is as important as the final piece. Enjoy the process, and let your creativity flow!
Happy creating!
Tips:
- Before diving into complex configurations, start with a basic setup. Understand each node's function and gradually add more complexity.
- Experiment with different configurations. The beauty of this system is the endless possibilities it offers. Small tweaks can make a big difference. Adjust parameters slightly to see how they impact the overall design.
- The nodes are designed to be intuitive. Drag and drop, connect, and disconnect them as you see fit. Don't be afraid to swap nodes in and out. Sometimes, a simple switch can lead to unexpected and delightful results.
- Combine multiple effects from the Effects Node for richer visuals. Layering can create depth and texture that a single effect might not achieve.
- Share your node configurations with fellow artists. Combining ideas can lead to innovative designs. Feedback can provide new perspectives and insights into your work.
