Brush that Music!
written by Alejandro
Introduction
Everyone who has looked into Enfantines’ code might have noticed that the tools I’ve used for the development of the project could be described as the very basics of generative art. This is not only because the collection has an educational purpose, but also as it aims at documenting my journey into a field which is new to me. Although I’m an architect that has been drawing with digital tools for more than a decade, only very recently I embraced the potential of randomness to produce compelling works of art. My two first fx(hash) projects are my entry to the space, transitioning from AI and Illustration to creative coding by hacking (in the literal sense of using an axe) my way through code-forest. Enfantines, on the contrary, is the first time I’ve approached creative coding in a systematic way, as the result of a research process.
project name project name project name
project name project name project name
project name project name project name
In this article, I’ll briefly outline the concept behind Enfantines, and explore two of the tools I’ve used at length in it: brushes and music. These two very things will remain through the following iterations of Enfantines (II and III), ensuring the coherence of the three limited-supply collections.
The algo that draws like a child
The idea behind Enfantines is simple: a script that is learning how to draw. Of course, the concept is mostly a funny joke on myself, who is —effectively— learning to draw with code, and who most of the time —when I check code by others— feels he draws like a child. Nonetheless, this “drawing like a child” should not be taken as a negative statement. We’ve had enough of a child-centred Twentieth Century to know that a child might be ignorant of some basic adulthood techniques, but she or he is undoubtedly capable of artistic creation and has an unrivalled imagination. For years, in my job as an architecture scholar/historian, I’ve been studying the work of artists, philosophers, and architects who were fascinated by the Children’s imagination and their creative potential. Particularly, I need to point out the oeuvre of the Dutch architect Aldo van Eyck, and his lifelong work with and around children. He is probably the main reference for the whole project at a conceptual level.
As explained in the project’s description, the Enfantines are three sets of beginner piano pieces by French composer Erik Satie, written with the aim of preparing children for the sound patterns of modern music. In the same manner, my Enfantines are a set of algorithms that explore the basics of Generative Art, written with the aim of preparing artists for the script patterns of digital life. The childish ethos of the project asked for vibrant colours and an almost naive feeling, “similar to kids drawings which can seem simple and dispensable, careless, but you will always have a parent who wants to frame it and put it on the wall” —@LukaPiskorec dixit.
What would happen if a computer found a case with coloured pencils, pens, markers, crayons and charcoals? A homage to Satie, the project was conceived as a partiture in which the algorithm tests its new generative drawing tools to the rhythm of Satie’s compositions. Therefore, the first iteration of Enfantines —Enfantines I, Small Talk— experiments with three basic generative tools: brushes, flowfields, and sound visualisation.
In a few words, the basic functioning of Enfantines, which uses p5.js, is like this.
GLOBAL PARAMETERS
- The script chooses the traits (palette, type of field, special distribution or colouring effects, pianist, etc.) for that hash.
SETUP FUNCTION
- Draw the background and paper texture
- Create the flow field (to know more, read Tyler Hobbs' article on flow-fields )
- Draw the gridlines following the field
- Distribute the strokes along the gridlines and store them in an array
DRAW FUNCTION
- Select mode (music or silent)
- Draw the strokes depending on mode
- Print Satie's lyrics. The lyrics are only visible when the iteration has a partiture-type field. If not, they get printed to the console.
Look at it again:
project name project name project name
The code of Enfantines has been commented for easy-reading, so I don’t think it’s necessary to get too technical here. I think it’s better to explain the main ideas behind both the generative brushes and the music synchronisation, and to push interested artists to look into the actual code if they want to know more.
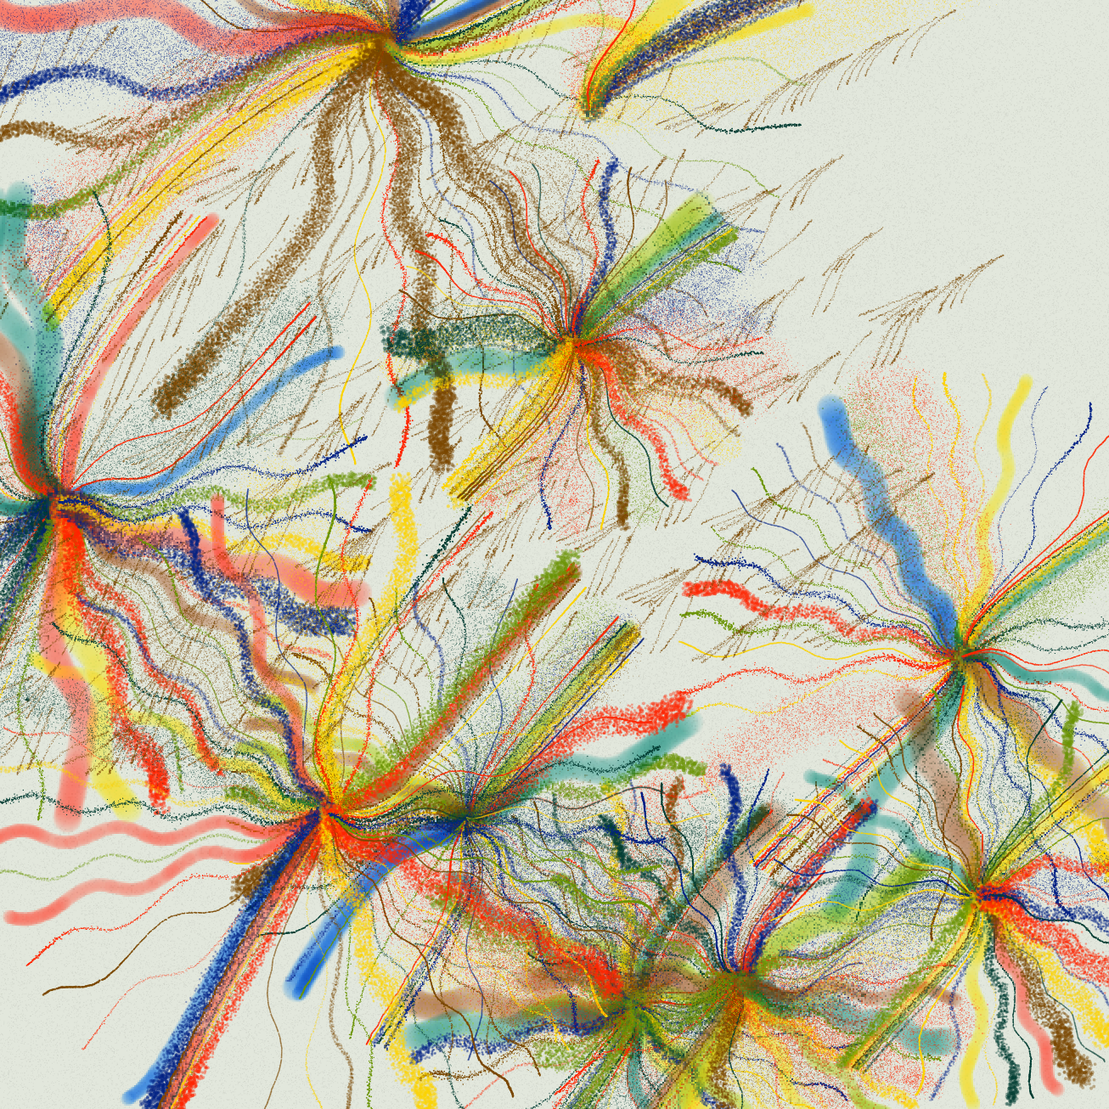
Generative Brushes: drawing with dots
Let’s start from the beginning: what’s a line segment? Of course, one could think that a line segment is an infinite long object between two points with no width, depth, or curvature. But that’s only a line in a conceptual sense. Let’s think about it in material terms: what’s a drawn line segment? A drawn line segment, one might resolve, is actually a finite collection of ink/lead/whatever marks between two points. Or simpler, it’s a collection of dots between two points.
The main foundation for Enfantine’s brushes is that real/material lines and curves, at the end, are made of dots. Thus, if we want to create a digital representation of real, concrete pencils, pens, and other types of drawing tools, we have to conceptually change our ways of drawing: we need to draw with dots. Of course, this requires new drawing functions fitting for the task, or, in other words, we need to redefine the primitive p5.js line, rectangle, ellipse, etc. etc. functions to fit our needs.
For instance, let’s define a “linea” (line in Spanish) function to make it render as a set of dots:
function linea (x1,y1,x2,y2) {
    strokeW = this.drawingContext.lineWidth;  // Get the current StrokeWeight
    var difX = x2-x1;		              // Horizontal difference between starting and ending points
    var difY = y2-y1;		              // Vertical difference between starting and ending points
    var difM = Math.max(Math.abs(difX),Math.abs(difY));	// Which one is bigger?
    var x, y;
    strokeWeight(strokeW);		      // Set Stroke Weight
    for (i = 0; i <= difM; i++) {	      // Draw one dot per each pixel between initial and end points
        x = map(i,0,difM,0,difX);
        y = map(i,0,difM,0,difY);
        point(x1+x,y1+y);
    }
}
This can further be adjusted to the different strokeWeights, in order to improve performance. When the stroke weight is bigger, you don’t really need a dot per each pixel (full working code here)
Now, this will essentially create a “normal”, continuous line, no different than the basic p5 function, and much slower, but it gives us the structure on top of which we can start creating our brushes. For instance, let’s make it so the dots have random little movements on the x and y coordinates:
function linea (x1,y1,x2,y2) {
    strokeW = this.drawingContext.lineWidth;
    var difX = x2-x1;
    var difY = y2-y1;
    var difM = Math.max(Math.abs(difX),Math.abs(difY));
    var x, y;
    strokeWeight(strokeW);
    for (i = 0; i <= difM*2/strokeW; i++) {
        x = map(i,0,difM*2/strokeW,0,difX) + rand(0,2*strokeW);
        y = map(i,0,difM*2/strokeW,0,difY) + rand(0,2*strokeW);
        point(x1+x,y1+y);
    }
}
That’s already looking like a pencil!
One could introduce many variations to this basic function in order to create different types of brushes. This code below is an example of a more complete function that allows for more flexibility, using the “vibration” and “pressure” variables. Vibration controls the random movement of the dots, and Pressure controls the fullness of the whole stroke. Full code here.
function linea (x1,y1,x2,y2) {
    strokeW = this.drawingContext.lineWidth;
    var difX = x2-x1;
    var difY = y2-y1;
    var difM = Math.max(Math.abs(difX),Math.abs(difY));
    var x, y;
    for (i = 0; i <= difM*2/strokeW; i++) {
        x = map(i,0,difM*2/strokeW,0,difX) + rand(0,vibration);
        y = map(i,0,difM*2/strokeW,0,difY) + rand(0,vibration);
        strokeWeight(rand(0.85*strokeW,1.15*strokeW))
        if (i <= 0.1 * difM*2/strokeW || i >= 0.9 * difM*2/strokeW) {
            if (rand(0,pressure*0.75)>2) {
                point(x1+x,y1+y);
            }
        } else if (i <= 0.35 * difM*2/strokeW || i >= 0.65 * difM*2/strokeW) {
            if (rand(0,pressure*0.85)>2) {
                point(x1+x,y1+y);
            }
        } else {
            if (rand(0,pressure)>2) {
                point(x1+x,y1+y);
            }
        }
    }
}

function rand(e, r) {
    return map(random(), 0, 1, e, r)
}

function setVibration (a) {
    vibration = a;
}

function setPressure (a) {
    if (a <= 3) {
        pressure = 3;
    } else {
        pressure = a;
    }
}
Line above has a vibration of 0 and a pressure of 30. Line below has a vibration of 2 and a pressure of 5.
Of course, this new line function is not very flexible and cannot simulate realistic changes in the strokeWeight, but we can always add more complexity on top of this basic foundation, in order to get the brushes we need. (For the Enfantines brushes, it’s important to note that I’m never drawing straight lines. The strokes follow the angles of the flow field, so the implementation is a bit different.)
After some work I arrived at a function that can help make our brushes more realistic, which uses both a gaussian distribution and a bell-shape. The full class is here, play with the parameters to see how different brushes you're able to create! In order to create your own brushes with this javascript class function, you'll need to tweak a few parameters for each brush, or create your own brush in the appropriate place. These are the user-customisable parameters:
// GLOBAL PARAMETERS for each BRUSH TYPE

       //etc etc
	case "pen":
            this.weight = 1;                    // Base Size
            this.vibration = 0.4;               // Vibration
            this.def = 0.3;                     // Definition
            this.quality = 5;                   // Quality/pressure
            this.opacity = 220;                 // Opacity
            this.step_length = 0.9;             // Base distance between dots
        break;
      //etc etc

//PARAMETERS FOR BELL FUNCTION
//The Bell-shaped function grants pressure simulation, making the start and end of the strokes bigger or smaller.

      // etc etc
	if(this.type == "pen") {
	// This is the middle point for the bell-shaped curve (relative to stroke length)
		this.a = rand(0.35,0.65);
	// This is the size of the bell (relative to stroke length)
		this.b = rand(0.7,0.8);
	// This is the max. weight for the stroke (relative to base weight)
		this.m1 = 1.3;
	// This is the min weight for the stroke
		this.m2 = 0.8;
	// This is the slope for the bell
		this.c = rand(3.5,5);
	}
      // etc etc
By changing those parameters and using this class constructor, you can very easily create a wide range of brushes. Feel free to use it for your own project. The specific implementation of the bell-shaped function and the gaussian blur should be easy-enough to understand, and it's probably too technical to explain further here.
FULL CODE HERE.
In order to use our new line function, you need to first initiate the brush by creating a new object with the class constructor function. After that, you can draw as many lines as you want with the object.line() function. For instance, let's assume you already created a "charcoal" brush in the main constructor class by tweaking the parameters above. You can now execute this code either in draw or in setup to draw lines using your brushes:
charcoal = new LineStyle(“charcoal”)
charcoal.line(100,100,200,200,0,2).  // line 1 -> x1,y1,x2,y2,color,weight
charcoal.line(200,200,200,100,0,2)	// line 2
charcoal.line(300,300,200,100,[255,0,0],3)	// line 3
//etc.
And with this implementation and a set of vibrant colours. Et voilà:
project name project name project name
project name project name project name
Music Synch: let the brushes dance!
As beautiful as these brushes could possibly be, the truth is that Enfantines wouldn’t be the same without Erik Satie’s music. Turns out that synchronising a .mp3 music file to the stroke drawing process was a simple task when one has a basic understanding of midi files.
The Standard MIDI File (SMF) is a file format that provides a standardized way for music sequences to be saved, transported, and opened in other systems. A MIDI file is basically a file that contains an array with the information of the audio’s notes: their appearing times, durations, pitches, velocities, and other details. This is how a MIDI file looks when opened in a digital audio workstation like GarageBand:
In an easy-to-read code format, a MIDI file looks like this:
MIDI files are hardly ever publicly available (you could maybe find some public domain classical compositions in MIDI format), meaning that, in order to get a MIDI file, you probably have to create your own with the help of a physical or digital keyboard. An important DISCLAIMER before continuing: you cannot sell a generative piece with a copyrighted song, nor most of the MIDI files you find online. Fortunately, Erik Satie’s compositions are public domain, and you can sell them as long as you create your own interpretation, which I did with the help of two different pianists.
Okey okey. Why are MIDI files so important?
Well, because the moment you have a MIDI file, and its corresponding .mp3 file with the desired song, you effectively have all the data you need to synchronise your generative artwork with your song. The process goes like this:
- Produce a MIDI file and its perfectly synchronised MP3.
- Import the corresponding p5.sound.js library into your html file
- Transform the MIDI file into a JSON
- Preload the JSON and the corresponding MP3 to your p5 Sketch.
- Play the Song and perform a draw action each time the song.currentTime() coincides with one of the JSON notes’ init-time.
Step 1 can be the most challenging for people without musical training. I suggest finding a musician here, it will save you from lots of headaches.
Step 2 is simple, just download the p5.sound.js and import it to your generator.
For Step 3, I’ve found that this website does a very good job of converting MIDI files to a JSON format. Copy the output and save is as a .json file.
The information we need to take from the JSON, once we have it imported it to our sketch, can be accessed like this:
soundJSON.tracks[track].notes[note_number].time;                // Note appearing time
soundJSON.tracks[track].notes[note_number].velocity;            // Note velocity
soundJSON.tracks[track].notes[note_number].duration;            // Note duration
soundJSON.tracks[track].notes[note_number].midi; 		// Note Pitch
Let’s look at the remaining steps in p5 pseudocode. Notice that the p5.sound play() function requires user input to avoid unwanted sounds, that's the reason you need to intentionally select Music mode for Erik Satie's composition to play.
function preload () {
	soundFile = loadSound(“route to mp3”);	// Import Song
	soundJSON = loadJSON(“route to json");	// Import JSON
}

let currentNote = 0; 	// Start from note number 0

function setup() {
}

function draw() {
	if(soundJSON.tracks[track].notes[currentNote].time <= soundFile.currentTime()) {
		// DO SOMETHING
		currentNote++;   // When a note has already been used, go to the next one
	}
}

function mousePressed() {
	soundFile.play();				// When mouse clicked, Start Song
}
Easy enough, right? Of course, this is just the tip of the iceberg, since you don’t only have the note time, but also its velocity, duration, and pitch. In Enfantines, these other variables have been used to modify the strokes colours, weights, and lengths, but possibilities are endless. Test the two different modes and check how they transform the strokes!
project name project name project name
Moreover, you don’t actually need a .mp3 song! You could theoretically play the midi file with p5 oscillators, using the midiToFreq() function to transform midi values into sound frequencies. However, this will produce a very unnatural (digital) sound which I did not like for this project. Nonetheless, this is a relevant method for anyone who wants to explore the field of generative music, in connection with generative visuals (more of this coming for the next Enfantines iterations).
In Enfantines, the code is a bit more complex for several reasons. On the one hand, there are two distinct songs with their synchronised JSON files, that get selected at the beginning of the sketch code. On the other hand, strokes get simultaneously drawn for the two piano hands (left and right), which are different Tracks of the JSON file. Besides, there are several modes, a limited number of strokes, and a lyrics function, which prints Satie’s music at the appropriate times and in the right places. But, essentially, the pseudocode above summarises the approach.
Details on Enfantines I worth mentioning
A/ Enfantines as a set
Enfantines will be a set of three generators, which doesn’t mean that those generators will look too similar. Basic attributes will remain (the palettes, the childish/vibrant feeling, Satie’s music, etc.), but each iteration will explore distinct generative tools.
B/ The traits and features
After careful consideration, few days before the drop I decided that Enfantines had to be appreciated individually. That’s why I buried most of the trait information in the code itself (you can access this information by pressing “I”). However, I also know that features often help collectors organise the iterations, so I kept the three most visible traits (palette, field-type, and pianist) as a way of filtering the collection.
The hidden traits are:
- Distribution types: controls the way in which the different strokes’ lengths are distributed
- SuperOrder(from 0 to 2): when activated, strokes are drawn every x number of places, making for very much ordered outputs.
- Caffeine (0 or 1): randomly multiplies the length of the strokes
- Selective (0 or 1): when activated, every strokes is from the same brush type.
- Rainbow (0 to 2): controls the distribution of colours.
- Shadow (0 or 1): when activated, it creates 45 degrees shadows for each of the strokes
- ShowGrid (0 or 1): when activated, gridlines disappear -> Very Rare (3%)
- Bugged: see below
project name project name project name
project name project name project name
project name project name project name
project name project name project name
C/ The bugged trait
I meant for the bugged pieces to be bugged. (What I did not take into consideration is that the preview would not generate, since the canvas does generate an image. This was a mistake). The bugged trait was inspired by an unexpected bug that produced a fascinating output. People seemed to like it on twitter, and hence:
The full code for the bugged pieces is in there, but a line makes everything break. I decided to keep it as part of the narrative.The four holders of the bugged pieces will receive their real Enfantines on print to their addresses (for free). I wanted to keep them a secret but apparently the bugged nfts do render in an old iPad. Someone found them and posted them on twitter
project name project name project name
D) The Story
Enfantines is accompanied by a short story (in the project description and in this twitter thread), inspired by Satie's inclusion of lyrics/short stories in his Enfantines.
E) Prints
Enfantines is designed to be printed in small size and with normal printers, like grandparents do with their grandchildren drawings. That’s the reason why I left the infinite variations opened post-mint. Preferably, try to find a coloured paper that fits your background, and ask me for a transparent bg version of your Enfantines. HQ prints might be available in the near future.
Closing words
I had lots of fun creating this project. Do the same, have fun, and don't hesitate to copy/change/utilise any code you want!
' If cities are not meant for children, they are not meant for citizens either.'